


 Express version: Your new WordPress site will work perfectly fine as is, but if you have a spare half hour, take the time to learn these optional extras for your own peace of mind. If you need to change your temp URL, you can move onto that now.
The lesson: Now we’re getting to the pointy end of things! Congrats – you’ve learned so much! Now it’s time for a few tweaks to keep things running smoothly.
Here are my top 20 tips for improving WordPress security and performance. (We’ve already covered some, but it’s good to have this checklist to double-check!)
1. Remove “admin” as username
As mentioned, this is the easiest username to guess! So make sure you change it to something less obvious (your e-mail address is not recommended as it may also be easy to guess).
2. Have a strong password
This is just as important as not having “admin” as your username. The strongest passwords have a combination of letters, numbers and symbols along with upper and lowercase text.
3. Change your login URL
Having strong usernames and passwords are great, but another idea is to hide the login page as well. The WPS Hide Login URL plugin changes your login URL (yoursite.com/wp-admin) to a URL of your choice. Eg: yoursite.com/smellycat (just be sure to remember what you change it to!).
4. Monitor who can user your site
If you have contributors or hire someone to help you with an issue, do your research before allowing them access. And, as soon as they’ve finished using your site, remove their user profile or downgrade their roles.
5. Change your database prefix
If you followed the BlueHost automatic installation lesson, you’ll know that you don’t have wp_ as your database prefix, so you can go ahead and ignore this tip! However, if you didn’t and want to change it, the Change DB Prefix plugin will do that for you, just make sure you’ve fully backed up your site before attempting this! I use and recommend Backup Buddy
6. Choose themes and plugins carefully
As I’ve mentioned a number of times now, if you want to use a free theme or plugin, stick with those available from the WordPress library. If you’re after a premium theme or plugin, do your research first and look for those with positive reviews.
7. Scan for Malware
For an annual membership, Sucuri will scan, detect and clean up any malware on your blog or website if need be. They perform checks on your site every 12 hours and send reports weekly. You can also visit their site for a free scan.
8. Schedule regular backups
Of course you’ve read about my love for backing up by now, so it will come as no surprise that regular backups are worth it! Again, I use and recommend Backup Buddy. Also, if you attempt to edit any of the files I mention below, you’ll want to ensure you’ve backed up first.
9. Update and/or remove inactive plugins
Never leave unused themes or plugins sitting in your site, and always perform regular updates of WordPress, installed themes and plugins. Here’s how.
10. Resize images before uploading
If you re-size your images to the correct size – and adjust their quality – before you upload them to WordPress, you’ll reduce their size (ideally under 100kb) which will in turn help stop your pages from taking so long to load. This is best done with Adobe Photoshop. If you don’t have this, you can try using PicMonkey along with the WP Smush plugin. If you have long posts and archives with many pictures, you might want to try the BJ Lazy Load plugin.
11. Install a caching plugin
Caching plugins are recommended left, right and centre, and it’s not uncommon to hear a blogger suggest WP Total Cache. However, my personal experience is that they’re not always the easiest things to set up, so I’m going to direct you to this post by WP Beginner for their tips. And remember, back up first!
12. Change security keys and salts
Say you logged into WordPress on a public computer, but forgot to log out and are no longer near that computer, you can replace your Salt keys to force log out. This will require use of your FTP. In your public_html folder, find and download your wp-config.php file. Open it on your computer with a text editor such as Notepad or Sublime Text and look for Authentication Unique Keys and Salts. Then, visit this WordPress link which will generate new “keys” for you. Copy and paste them into your document, save it and upload it to your site. This is similar to what you’ll be pasting/replacing:
define('AUTH_KEY',         'x<p);P8eJYrSEdHB1Z=#8iHoheWjCLUSG{-#I&sV.4?=]7bI/MS@?U!;Voh5qB9T');
define('SECURE_AUTH_KEY',  '&Q$@FG&?{u 5foj`[~<$NCGDf1?FG3Xg+Pp8UAd6sbqF5{mw.9,@93e/TX1^F6p%');
define('LOGGED_IN_KEY',    'peNA(2cTI[r^c0V{/8kuGYQa0>`O&f$[4L%{X[&5yP;K0T_lR}Ko)C/k@Xm3T<N-');
define('NONCE_KEY',        '>:<FE!2715?8~}u+V`Gf0+i]ZnV}iZm=u2YhNmLW#mJobb-6y+]*jqn#GgoIJ!r[');
define('AUTH_SALT',        '!{)nH+wm}S|Q(-y{u0c:?`h&b;nWl:al:=OqAefAM%.N@M,=WHFKJs3A.t:c}4Ko');
define('SECURE_AUTH_SALT', 'x}s$?gXZLFRk#z7ELo5He!|hYQLB-KhQ/xZbBfb`={q[suN~5t&hiK>:.34r|T |');
define('LOGGED_IN_SALT',   'Si#rB7e(T:X7BoZH02lZH` $V|~z4+.#WR!h?tv-,S!ryK0y,-[#]FT@C-80qP0g');
define('NONCE_SALT',       '1&Z%a9KHd r_>9qfQa+:@W^RP|l-N+K|ig$>v@m79+f+kg^QU-t@fNLs1dxTBp7q');
And this is how it will look:

13. Limit revisions and auto save intervals
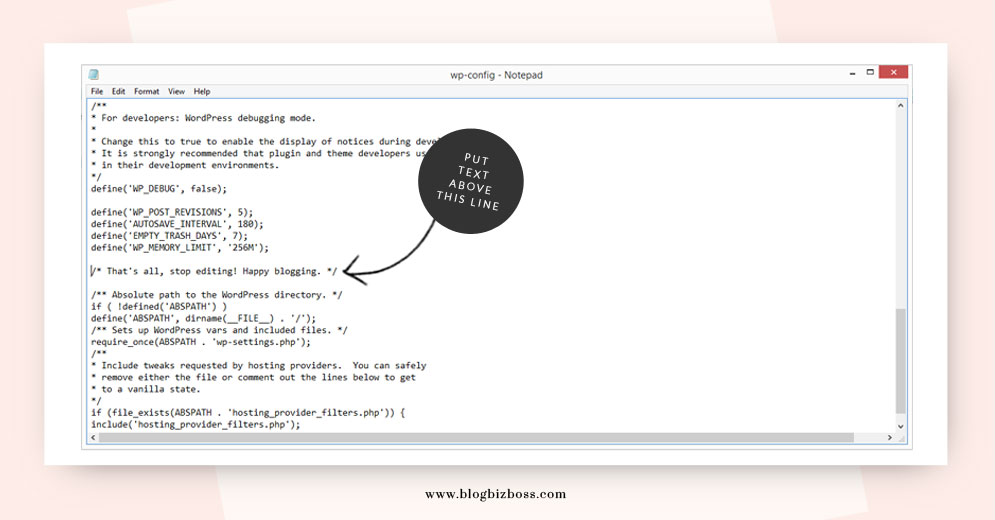
Every time you write a post, WordPress automatically saves it as you go. Each version saved is called a revision and can be handy if you accidentally delete some text and need it back. The downside to these revisions are that over time they can start to take up a lot of space in your database. An easy fix is to limit the number of revisions per post to the last 5 or so, and reduce how often revisions are saved (in seconds). This is done by again accessing your wp-config.php file via FTP (as above). Now, look for the line that says /* That’s all, stop editing! Happy blogging. */ and directly above it, paste the following:
 define('WP_POST_REVISIONS', 5);
 define('AUTOSAVE_INTERVAL', 180);
This code – and the code in tips 14 and 15 – looks like this when put in the correct place:
14. Limit trash
Like revisions, trashed items can also start to take up a lot of space in your database. You could periodically empty your trash, but an easier way is to have it automatically deleted after a certain number of days. Just as you did in the step above, copy and paste this above the /* That’s all, stop editing! Happy blogging. */ line (this will empty the trash every 7 days – you can adjust the number of days if you wish):
define('EMPTY_TRASH_DAYS', 7);
If you’re using BlueHost (which I recommend) you will also find settings for revisions and trash within the cPanel.
15. Increase memory
From time-to-time you may encounter a warning or error message that says your memory is exhausted. Increasing your memory limit is also easy – and identical to the two tips above. Again, go to your wp-config.php file and copy and paste this above the /* That’s all, stop editing! Happy blogging. */ line:
define('WP_MEMORY_LIMIT', '256M');
16. Deny/allow IP addresses in .htaccess
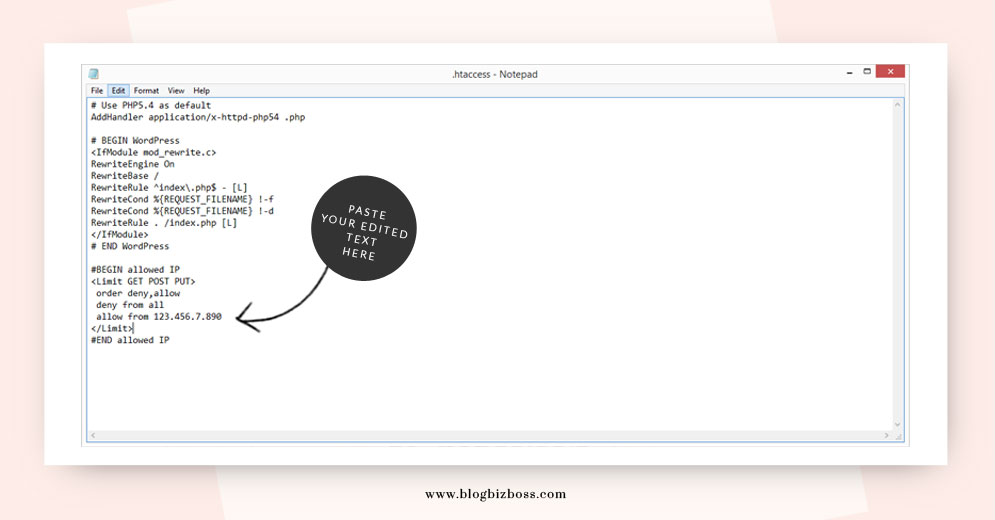
This security step restricts people from logging in unless they’re from a specific IP address (ie, your IP address!). First, find out your IP address by googling: What is my IP address? Then, using your FTP, go to your public_html folder find and download your .htaccess file. Using a text editor, put in the following text, replacing the IP address with yours – it goes below the text that says # END WordPress. Note: If your IP address changes, you’ll need to re-do this step (over and over and over!) so it may not be suitable for you (and you’ll find the next tip easier).
#BEGIN allowed IPorder deny,allow deny from all allow from 123.456.7.890 #END allowed IP
And this is how it looks:
17. Login Lockdown
If the above tip becomes too difficult to manage, you might like to try Login Lockdown which is a free plugin from the WordPress library that will limit the number of login attempts made from a single IP address. Currently the plugin defaults to a one-hour lock out of an IP block after three failed login attempts within five minutes.
18. Remove the WordPress version number
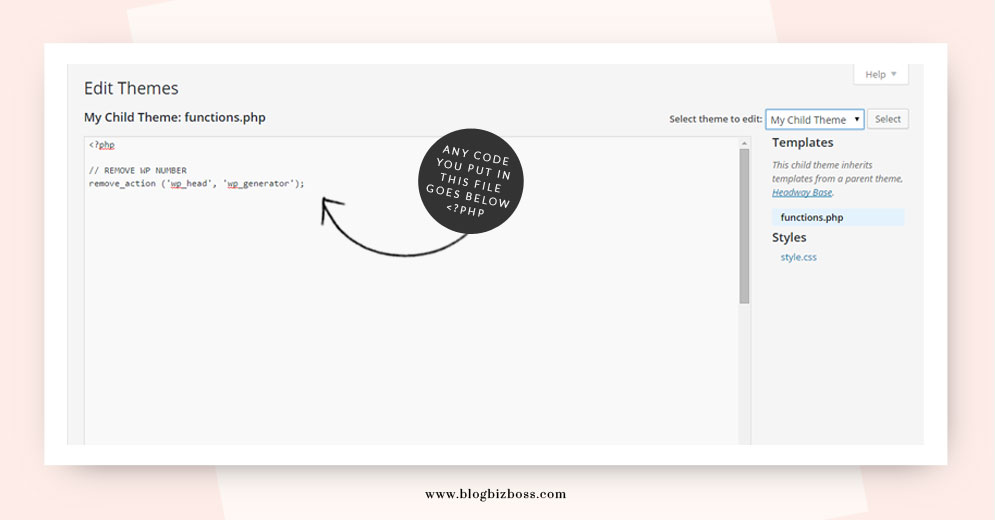
This involves editing your functions.php file – which, as you’ve now learned, is done in your theme or child theme. Simply paste this code into it below <?php:
// REMOVE WP NUMBER
remove_action ('wp_head', 'wp_generator');
And this is how it looks:
19. Optimize and repair your databases
Sometimes your databases – the part of the control panel where your posts, comments, theme and plugin settings are stored – can run a bit slow. This is where database optimizing and repairing can come in handy. BlueHost recommend you do this about once per month (though I’ve never done it even close to that often!) and have a simple tutorial to follow here.
20. Consider iThemes Security Pro
iThemes Security Pro is an advanced, premium plugin that will do many of the security things I’ve mentioned here – and much more. There are more than 33 features including: Away Mode, turning off file editing from within the admin area, detecting 404 errors that can affect SEO, scanning your site for vulnerabilities, displaying a random WP version number and so on. Get it here.
Of course, all of these pointers are completely optional! I’d say the most important tips are having good passwords; being able to back up with Backup Buddy; updating WP, themes and plugins; knowing how to resize pictures before putting them in posts; and perhaps using iThemes Security Pro too. Combined, these five pointers should be of great advantage.
Also…
Stay across security and performance news if you can. Many blogs – such as Mashable and the official WordPress blog – will report on latest updates and developments to help you keep your site secure and working well.
Related video
This YouTube video by user MrCyberSmart shows how to replace salt keys.
Have you got any questions about WordPress security and performance? Ask in the comments below!
Next lesson: How to change your temporary WordPress URL

I did the wp-config.php editing using Sublime Text… now I have to upload that file? How do I do this? I’m using Filezilla
Thanks for your patience! 🙂
That’s correct! The new file replaces the old file via FTP. See the lesson on uploading and downloading the FTP files. Congratulations for giving it a go!
Oh yes, that’s it! I had a sample one. But I did edit the correct file and not the sample! Go me!
I finally had a full day to work on this (a rarity, indeed)! I’m so excited!
And now, my brain is fried. 🙂
Well done – you’re doing so well!
Shewwwww!! Ok. I did the copying and the pasting.
However…I have TWO wp-configure folders apparently. What does that mean?
I went with the bigger one.
Wow, you’re steaming ahead! OK, so if you only have one WordPress site, there should only be one wp-config file within your public_html folder. If there is a second, it’s called wp-config-sample. Is that what you’re seeing?